Showing posts with label ANDROID TUTORIALS. Show all posts

How to fix app unfortunately stopped errors


There is one problem that plagues beginner and advanced Android owners alike: the cursed Unfortunately, (fill in app name here) has stopped error message

 It appears when you're in the middle of using an app, and then forces that app to close. Annoying, right? Fortunately, there is a way to stop it.
Here's how to fix Unfortunately, app has stopped errors.


===>Clear out the app's storage
This problem often arises with the contacts, gallery and launcher apps. The procedure to fix this is generally always the same.

-First, navigate to Settings on your device.
-Go to Applications > Application manager
-Swipe left until you find the All tab.
Scroll down to the app that's causing problems and tap on it.
Here you will find the Clear data and Clear cache options.
-Clear cache is the option you should start with. It will get rid of saved data that allows apps to load a little quicker when you launch them. Clearing it means the app will open a little slower, but your main problem might well be solved.

===>Clear data will erase all the app's data, including files, settings and accounts, so don't use this unless you have to.


===>Clearing an app's cache can often solve the 'app has stopped' problem.

===>Uninstall and reinstall the app
If the app isn't built-in, you can also try uninstalling it and then reinstalling it from the Google Play Store. Simply open the Play Store app, open the menu bar on the left hand side and tap on My apps. Find the app in question and hit Uninstall, which takes a few seconds. Atterwards, you can install it again.


===>Turn it off and on again
You can also try doing a soft reset, which simply means restarting your device. This is super simple and quite effective if your phone has been on for a long time. A soft reset will power cycle your phone, turning it off and then back on again.

It’s a good idea to turn ur phone off every few days for a few minutes – this will help a sluggish phone with a variety of issues, whether they're related to the app, network, audio or email.


⭕️Last resort: do a factory reset
When the above solutions have failed, you can resort to factory reseting your phone. When doing a factory reset, ensure that you have backed up all of your data beforehand. I repeat: back up all of your data first. A factory reset will wipe your device and set it back to factory defaults, taking everything, including any bugs, with it. You can restore your apps and data afterwards easily, as long as you've made a backup.


TWRP for Redmi Note 4x and Installation guide

Twrp is one recovery that you must have, because of its vastness it's widely accepted by most android users. Twrp is always required when flashing ROMS, Zips and other files via your recovery, this guide will show you how to install twrp successfully on your Xiaomi Redmi Note 4X[mido]


Requirement

  • Unlocked Bootloader
  • Twrp[link at the end of this post]
  • PC
  • Usb cord
  • Adb or minimal adb and fastboot drivers


Step 1: Install adb or minimal adb and fastboot drivers on your pc
Step 2. Download twrp-mido.img and follow step 3
Step 3. Copy twrp downloaded in step 2 and paste in adb folder located in C:\adb on your pc
Step 4. Hold SHIFT key and right click

Folder should look like this

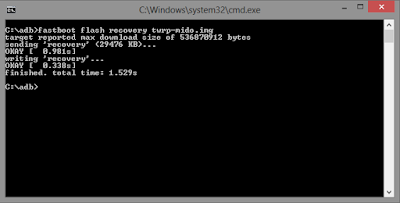
Step 5. Open cmd window and type the following commands fastboot flash recovery twrp-mido.img and hit enter

Step 6. Boot your phone into fastboot mode[power key + vol down]
Step 7. Plug phone to pc and wait for twrp to be flashed

Twrp should successfully flashed as indicated in the image above

Step 7. Boot into Twrp Recovery

If your bootloader is unlocked CLICK HERE to unlock

Required files
TWRP FOR MIDO
ADB and FASTBOOT drivers
Minimal Adb and Fastboot Drivers

HOW TO SAVE WHATSAPP STATUSES


So you don't have to ask someone to send you a picture/video you viewed.

1. Open your file Manager
2. Press "option" key 》settings 》check "view hidden files"
3. Go back to the File Manager and scroll to the whatsapp folder.
4. Open "Media" folder
5. Usually the first folder you should see is ".statuses"
6. That folder contains all the viewed statuses over the 24hr period.
7. Take note that they automatically delete themselves after 24hr.
8. To save the viewed file for future, move/copy it/them to another folder of your choice.


Hope you enjoyed it... please share

Top 15 Uses Of OTG Cable That You Should Know


As we all know, USB OTG or USB On-The-Go is one of the important inventions and it can be used in many ways. We have mentioned Top 10+ Uses of OTG cable that you probably don’t know.


USB On-the-Go which is also known as USB OTG or simply OTG cable which allows USB Devices to act as a host allowing other USB devices to be attached to them. It is normally used to extend your device’s functionality. You can easily transfer data from the smartphone to Pendrive and vice versa.
However, do you know OTG Cable is capable of doing more than just transferring Data? Therefore, we have compiled an article which will describe the 10+ best uses of OTG cable which you probably don’t know.

#1 You Can Charge Android with another


This is a feature that some of us android users might know about but there are still some Android users out there who don't know about this but it'll interest you to know that with an OTG cable you can charge an Android phone with another Android phone, this could especially come in handy in case of and emergency.

#2 Connect a Portable Hard Drive


You can connect the portable hard drive or external storage with the help of an OTG cable. You just need to connect the OTG cable to your smartphone an external storage. You can access the external storage device easily. You can even transfer files from phone to external storage with the help of OTG cable.

#3 Connect a Game Controller

If you think it’s too boring to play first person shooting Games in an Android device then you can try connecting a Game controller with your Android device through OTG cable. Nowadays many Android games support external gamepad, and you can easily connect an external game controller to your device using OTG cable.

#4 Connect USB Light


Have you ever imagined that if your phone could light up a LED lamp? Of course, you will say no! However, you can connect a USB based LED Light to your Android phone using OTG cable. You can even connect LED flashlight for capturing images at night if your phone doesn’t have a front flash feature.

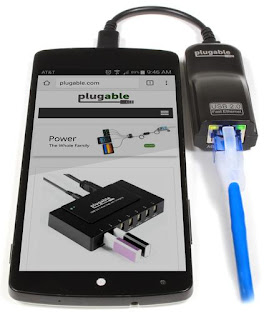
#5 Connecting LAN cable


You just need to buy a LAN to USB controller and connect it to your Android device! Just like shown in the image above. You can enjoy the broadband internet in your Mobile directly.

#6 Share Contacts, Messages between two phones


With the help of Samsung’s SmartSwitch app, you can transfer messages, call logs, contacts and much more between Android devices with the help of OTG cable. This will be very useful and also consumes less battery.

#7 Connect Keyboard and Mouse


If you don’t like to navigate your Android device! If you use messaging apps like WhatsApp and Facebook a lot then you will love to exchange messages with Keyboard and Mouse. You can connect your USB mouse and Keyboard with your Android device using OTG cable.

#8 Connect a camera


If you love photography then you will love to connect your Android device with Camera. Now you don’t need to connect your Camera with Computer if you need to clear up few pictures just connect your Android device with Camera using OTG cable.

#9 Print Saved Documents in Android Phone


You can use the app PrintShare which will automatically download drivers for USB printers on your Android smartphone. Just connect your Printer with Android device with the help of OTG cable to print a document directly.

#10 Connect a USB Fan


USB Fans almost works with the electric charge. However, you might have seen Laptop cooling pads are usually connected with the help of USB. You can connect USB fan with your Android Device using OTG Cable.

#11 Create Music On Android


Well, almost every modern musical instruments like keyboards, guitars can directly connect with PCs via the MIDI standard. Well, with USB OTG, you can connect all the instruments with your Android devices.

#12 Connect Ethernet


Do you know, you can also use the wired Internet generally known as Ethernet on your Android devices directly with the help of OTG cable? Well, there might be times when you don’t have access to WiFi or cellular data, that time connecting Ethernet using OTG will turn very useful.

#13 Recording Audio with external Microphone


Well, Youtubers will find this very helpful. You can use an external microphone to record your voice in Android. Users can connect the external microphone on to the Android using OTG cable and can record it.

#14 Card Reader


If you are holding an Android smartphone that doesn’t support microSD card, don’t worry with the help of OTG cable you can use your card reader to connect with your phone. You just need to have an OTG Plus Card reader, which lets users connect MicroSD card with any Android.

#15 Chromecast or HDMI


With the help of OTG cable, you can mirror your Android screen to your home TV. Users just need to have an HDMI cable or Chromecast and OTG cable to connect their phone to TV or LED in the USB port. You can watch movies, play audios using this trick.
So, these are few lesser known uses of USB OTG cable! If we had missed any feature then let us know in the comment section below. I hope you like the post! Share it with your friends too.

How To Root Redmi Note 4/Note 4x[SD]


Alot of android users love to root their android devices, to unleash the full power of the android system, So here is a guide showing how to root Xiaomi Redmi Note 4/4x[SD]


REQUIREMENTS

  • TWRP for Mido
  • Pc
  • Usb Cable
  • Super SU
  • no-verity-opt-encrypt zip
  • ADB and fastboot drivers 
  • Unlocked Bootloader
You must have ADB and fastboot drivers properly installed on your PC, if you haven't  DOWNLOAD ADB AND FASTBOOT DRIVERS

STEP 1:To root your redmi note 4x, it is important you unlock your bootloader  CLICK HERE TO APPLY
 After you have successfully unlocked your boot loader, the next step is to flash twrp recovery

STEP 2: Download Twrp from the link provided below and copy twrp-mido.img to C:\Program Files (x86)\Minimal ADB and Fastboot folder

STEP 3: Power off device and boot into fastboot mode by holding both power button and Vol - keys at the same time, then connect device to pc

STEP 4: Open a command window and type the following fastboot devices 
If your device is properly connected and drivers are working properly, your device should show as indicated above.
Now type the following fastboot flash recovery twrp-mido.img You should get the following result

 Now boot into recovery using POWER and VOL +, you should see twrp screen 
 
STEP 5: Swipe to allow modifications on twrp

STEP 6: Go to backup and make a backup of your current ROM[ very important]


STEP 7: Click INSTALL option and locate SuperSU zip from your storage and swipe to flash

STEP 7: Click INSTALL again and locate no-verity-opt-encrypt zip and swipe to flash

STEP 8: Reboot your device after flashing

If you follow these steps accordingly you will have successfully rooted your Xiaomi Redmi Note 4/4x

FILES TO DOWNLOAD
TWRP FOR REDMI NOTE 4X
NO-VERITY-OPT-ENCRYPT
SUPER SU

[ALL VERSIONS] MINIMAL ADB AND FASTBOOT


Adb is a very important feature of android, because it enables your device to communicate with your computer. Installing Minimal ADB and Fastboot enables you to get the latest version of ADB and Fastboot on your PC.


Minimal ADB and Fastboot supports all windows version so you dont have to worry if youre running on a 64bit or a 32bit, it works for windows 7,8, and 10. Below are the download links for all versions of Minimal ADB and Fastboot ever released


Dolby atmos surround mod for all Android versions

Here's a sound mod that enhances music experience. Its actually the favourite of many android users.
If you want to experience the bass feeling when playing music then you definitely need this!

Note: This is not a regular apk that can be installed
This zip must be flashed through a custom recovery.

How to flash

Download dolby [ dap_r6.5 ] zip
Copy zip to sd card root
Boot into your custom recovery using vol and power + combo keys
Install zip
Locate dap_r6.5 zip and
Click to install or swipe to flash [Twrp]
Reboot your device and experience the difference!

Dolby deep buffer remover ( flash this only when you experience deep buffer when playing music)

Common Adb commands you should know

If you are a developer or a wannabe then you should definitely have an idea of adb and how to use it because it is a very important tool!

But sadly, alot of people do not know how to use it or what to use it for. So here's a quick list of some adb commands and what they're used for. This list will be updated with time.

Stuck on bootloop ? Stuck on Animation logo ? Stuck on Recovery and storage does not mount ? Do you need to push or pull files from your device? ADB has the solution for all of this.

To set up adb on your pc, you'll need a few things

* Adb and fastboot installer for windows xp/vista/7/8/10
* PdaNet [ links below ]

To send files from your pc to your device without using file manager

In adb terminal type the following

"adb remount" this will mount your device as Read/Write then...

"adb push filename - path to send
Example

adb push Systemui.apk - /system/priv-app
Changing permissions after pushing files is necessary in most cases otherwise it might lead to bootloops

To fix permissions
In terminal type "adb shell"
Type "chmod 644 filepath"
Example "chmod 644 /system/build.prop"
Replace 644 with correct permissions. For build.prop and other system files it is usually 644

Stuck at bootlogo? This is common to porters or those trying to get new roms flashed. Well, when this occurs you can take a logcat as long as your device is still detected

In terminal type "adb devices" [ This shows if your device is still connected or not ]

If device is detected then type "adb logcat > logcat.txt"

After about 5-10 seconds press "Ctrl+C"

Note : You will now get the logcat.txt in the directory in which cmd is opened

MagBolt: The one cable to rule them all

Having both Apple and Android devices can be a pain when it comes time to charge them. As both devices come with their own set of charging ports, it can be a hassle to separate the Apple cables from the Android ones.

However, a company has an idea that could simplify the device charging experience: MagBolt. Dubbed “the world’s first Apple and Android magnetic connector,” the MagBolt is a dual-sided magnetic connector.

On one side, the MagBolt sports an Apple Lightning adapter; on the other, a USB-C adapter Android users are familiar with. By merely flipping the connector over, the port can charge devices from both camps. Also supported: fast charging and a magnetic snap-on.

The magnetic connector is complemented with its own magnetic cable. All you need to do is plug the MagBolt’s magnetic connector to your device’s port then snap in onto the connector much like how Macbook cables work.

Additionally, the nature of the MagBolt’s magnetic connector also allows it to protect your device’s charging port from dirt, dust and water.


Share your thoughts in the comments section below. Do you support MagBolt or nah? 

Google pixel boot animation for Android devices


Want to see how the new Google pixel boot animation looks like on an android device?
Just follow these simple steps to give your device a pixel feeling
Root or custom recovery required
HOW TO INSTALL(custom recovery)
• Download Zip.
• Reboot to Recovery.
• Flash Zip.
• Reboot.
• Done.

(OR)

1. Install Es File Explorer [download from Google play] Or use Alternatives Like Root Explorer if available
2. Go To device/System/media
3. Rename your current boot animation to bootanimation.zip.bak
4. copy and extract the downloaded bootanimation from the below link and paste it on "system/media"
5.Reboot the device

DOWNLOAD LINKS

1. Black edition of pixel boot animation: DOWNLOAD

2. White edition: DOWNLOAD

HOW TO STOP APPS UPDATING AUTOMATICALLY IN GOOGLE PLAY

If you've ever picked up your phone to see that Google Play is going crazy and auto-updating app after app, you might feel your stomach tightening up as you see your data allowance evaporating into thin air. Fortunately, this is easy to solve. We'll show you how to stop apps from updating automatically so that Google Play only updates when and how you want it to.


As a general rule, apps you have installed from Google Play will download updates automatically (called auto-update apps) in order to improve their performance on your tablet or smartphone. Generally speaking, this is a good thing, but it can also slow down your phone, use up your mobile data and stop you from doing other things with your device. This is where manually updating apps can be more practical.

How to disable auto-update apps in Google Play


1. Open Google Play and swipe out the navigation drawer. Choose Settings.

2. In the Play Store settings, tap Auto-update apps.


3. You'll see three options (which can be changed at any time): Do not auto-update apps; Auto-update apps at any time. Data charges may apply; and Auto-update apps over Wi-Fi only.


4. Choose the first one. Note that this means you will always need to manually update all apps in the future. If you still want apps to update automatically, just not on your data connection, select Auto-update apps over Wi-Fi only.


32BIT PORTING GUIDE FOR MT6580 Marshmallow

32BIT PORTING GUIDE FOR MT6580 Marshmallow

 Image result


Before porting you should have your system folder[unpacked] and PORT-ROM ready. So assuming that is done.. do the following.

replace these files in BIN from stock to port :
akmd09911
applysig
audiocmdservice_atci
factory
gzip_static
kpoc_charger
vold

replace these files in ETC from stock to port :
firmware folder
mddb folder
bluetooth
wifi

replace these files/folders in LIB from stock to port :
Entire HW folder [ do not delete port first, just replace ]
Entire Soundfx folder
libcamalgo.so
libcamdrv.so
libcamdrv_FrmB.so
libcamera_metadata.so
libcameracustom.so
libvcodecdrv.so

FOR Boot.img  :
Unpack stock and port boot img and
Replace Kernel From Stock To Port boot img

zip ROM folder and flash

Expect a rom that boots!!


64BIT ROM PORTING TUTORIAL

 https://blogger.googleusercontent.com/img/b/R29vZ2xl/AVvXsEgtcuQ8_uTekJS_HicYNW_TJeivstr8FlDG0KtQr1ReUqREE3nK2AHe9eigguX8OCs0LNPNEEAr8BmF6kPAJbVrZhyYddORPlm5qh05spVnAZQarLbiWlD2WqbpJDQWoTjvZ55GK1-JUBQ/s1600/_20150605_165300.JPG


IF you love roms and you wanna try porting one then here is a quick guide for porting 64bit roms

NOTE: THIS does not apply to 32bit devices

If anyone finds additional items or wants to complete this guide please feel free to add it in here.

To use this tutorial then you should know how to work around roms and SYSTEM IMGS
Droidtek360 wont be responsible for whatever happens to your device if you use this tutorial

NOTE: ALWAYS REMOVE RECOVERY-FROM-BOOT.P before you do anything else.

CROSS PORTING GUIDE

SO THE FILES NEEDED TO REPLACE FROM STOCK TO PORT:

BIN FOLDER MODIFICATION:
afm_server
akmd09911
applysig
audiocmdservice_atci
climax
custom_sn
encfs
factory
factory_reset.sh
fusermount
gzip_static
ipod
kpoc_charger
mtkbt
nvram_proximity
seeder
updater
vold

IF SOME OF THE ABOVE FILES ARE ABSENT, DONT WORRY JUST SKIP THEM

FOR ETC FOLDER:
take the whole firmware folder from system/etc/
take the whole mddb folder from system/etc/

LIB FOLDER:
lib3a.so
libacdk.so
libbluetoothdrv.so
libbluetooth_mtk.so
libbypass.so
libcam.camadapter.so
libcam.camnode.so
libcam.camshot.so
libcam.client.so
libcam.device1.so
libcam.device3.so
libcam.exif.so
libcam.exif.v3.so
libcam.hal3a.v3.so
libcam.halsensor.so
libcam.iopipe.so
libcam.jni.lomohaljni.so
libcam.metadataprovider.so
libcam.paramsmgr.so
libcam.sdkclient.so
libcam.utils.so
libcam3_app.so
libcam3_hwnode.so
libcam3_hwpipeline.so
libcam3_pipeline.so
libcam3_utils.so
libcamalgo.so
libcamdrv.so
libcameracustom.so
libcamera_client_mtk.so
libcam_hwutils.so
libcam_platform.so
libcustom_nvram.so
libdpframework.so
libfeatureio.so
libfeatureiodrv.so
libhardware_legacy.so
libimageio.so
libimageio_plat_drv.so
libipod.so
libJpgDecPipe.so
libJpgEncPipe.so
liblocSDK5c.so
liblocSDK_2_5OEM.so
libm4u.so
libMA3-wavesfx-Coretex_A9.so
libmhalImageCodec.so
libMiraVision_jni.so
libmtkjpeg.so
libmtk_drvb.so
libnetworklocation.so
libnvram.so
libnvramagentclient.so
libnvram_platform.so
libnvram_sec.so
libshowlogo.so
libtfa9897_interface.so
libvc1dec_sa.ca7.so
libvcodecdrv.so
libvcodec_oal.so
libvcodec_utility.so
libweibosdkcore.so
mtk-ril.so <= IF U GET BOOT LOOP TRY WITHOUT REPLACING THIS FILE
mtk-rilmd2.so <= IF U GET BOOT LOOP TRY WITHOUT REPLACING THIS FILE

And this subfolder with these libs:
drm\libfwdlockengine.so
egl\egl.cfg
egl\libGLES_mali.so
hw\audio.primary.mt6752.so
hw\audio_policy.default.so
hw\bluetooth.default.so
hw\camera.mt6752.so
hw\gps.default.so
hw\gralloc.mt6752.so
hw\hwcomposer.mt6752.so
hw\lenovopower.default.so
hw\lights.default.so
hw\sensors.mt6752.so
soundfx\libdownmix.so
soundfx\libmaxxeffect-cembedded.so

LIB64 Folder:
lib3a.so
libacdk.so
libbluetoothdrv.so
libbluetooth_mtk.so
libcam.camadapter.so
libcam.camnode.so
libcam.camshot.so
libcam.client.so
libcam.device1.so
libcam.device3.so
libcam.exif.so
libcam.exif.v3.so
libcam.hal3a.v3.so
libcam.halsensor.so
libcam.iopipe.so
libcam.jni.lomohaljni.so
libcam.metadata.so
libcam.metadataprovider.so
libcam.paramsmgr.so
libcam.sdkclient.so
libcam.utils.sensorlistener.so
libcam.utils.so
libcam1_utils.so
libcam3_app.so
libcam3_hwnode.so
libcam3_hwpipeline.so
libcam3_pipeline.so
libcam3_utils.so
libcamalgo.so
libcamdrv.so
libcameracustom.so
libcamera_client_mtk.so
libcamera_metadata.so
libcam_hwutils.so
libcam_mmp.so
libcam_platform.so
libcam_utils.so
libcustom_nvram.so
libdpframework.so
libfeatureio.so
libfeatureiodrv.so
libhardware_legacy.so
libimageio.so
libimageio_plat_drv.so
libJpgDecPipe.so
libJpgEncPipe.so
libm4u.so
libmhalImageCodec.so
libMiraVision_jni.so
libmtkjpeg.so
libmtk_drvb.so
libnvram.so
libnvramagentclient.so
libnvram_platform.so
libnvram_sec.so
libtfa9897_interface.so
libvcodecdrv.so
libvcodec_utility.so

And this subfolder with these libs:

drm\libfwdlockengine.so
egl\libGLES_mali.so
hw\audio.primary.mt6752.so
hw\audio_policy.default.so
hw\camera.mt6752.so
hw\gps.default.so
hw\gralloc.mt6752.so
hw\hwcomposer.mt6752.so
hw\lenovopower.default.so
hw\lights.default.so
hw\mmsdk.default.so
hw\sensors.mt6752.so
soundfx\libdownmix.so

VENDOR FOLDER:
system\vendor\etc\audio_effects.conf
system\vendor\etc\default.mps

FOR DIFFERENT CHIPSET (i.e. 6795 to 6752)

Proceed as above THEN

open build.prop
EDIT THESE LINES

ro.mediatek.platform=MT6795 to MT6752

mediatek.wlan.chip=MT6630to CONSYS_MT6752
mediatek.wlan.module.postfix=_mt6630to _consys_mt6752

FOR BOOT IMG
Unpack both stock and port boots from CarlivImageKitchen Tool
Now
In port boot.img
replace the boot.img-kernel with stock's

and in ramdisk folder copy the following from stock

    fstab.mt6752
    init.mt6752.rc
    init.mt6752.usb.rc


AND DELETE THOSE with mt6795 and mt6595 words.

REPACK THE KERNEL

COPY NEW BOOT IMG TO PORT ROM FOLDER

ZIP AND FLASH YOUR ROM

If u get WIFI AND BLUETOOTH NOT SWITCHING ON OR BATTERY PERCENTAGE WRONG THEN REPLACE init.project.rc

NOW FOR SAME CHIPSET PORTING i.e [ MT6580 > MT6580 ]


Just replace

etc/firmware
etc/mddb

and from LIB,LIB64 and HW folder replace all libs named like this camera.mt6752.so
and replace audio_policy.default.so from  HW folder

from lib and lib64
replace
libcameracustom.so
libaudiocomponentengine.so
libaudiocustparam.so
libnvram.so
libnvramagentclient.so
libnvram_platform.so
libnvram_sec.so
libcustom_nvram.so

Modify your boot img, build prop[if necessary]
zip your rom and flash


Credits: XDA

Kategori

Kategori